Saturday, January 24, 2015

Get your hands into it: WHOLE whole wheat buttermilk bread

Ragazzi, it is one of those nasty late January days, where Annalena just wants to hide in the apartment.  The kitties are all laying around like they've been sedated (would that this were true), and we're all, in Woody Allen's words "so mellow we're beginning to rot."

A perfect day for bread baking.  And ragazzi, we're going to do REAL whole wheat bread.  By that, Annalena means bread that has NO. WHITE. FLOUR  in it.  And no, it is not a doorstop because, at this point in her life, Annalena has learned to be patient.  If you are, you get:

There are SO many myths and fears about bread baking, ragazzi, and this is a shame.  Once you get the hang of it, you will LOVE making your own bread.  Annalena knows that some of you already do it, but more of you should.  Trust Annalena:  once you get used to the fresh stuff, NOTHING will compare.  And once you get the hang of it, you can play with recipes, play with additions, and there's a whole new world. 

Let's chat a bit about baking with whole wheat flour.  There is a notion, not without support, that when you bake with whole wheat flour, you get heavy, dense, products, that simply do not taste good.  
The fact is, whole wheat flour IS heavier than white flour.  If you are enamored of puffy loaves, and soft centers, this bread is not for you.  It will NEVER scale the heights that, say, that bread that comes in a plastic bag with balloons on it does.  But it is SO good.    As far as taste goes, whole wheat flour has a high oil content.  So it goes rancid if you do not use it quickly, or keep it cool, etc.  So buy small quantities.  And, finally, when you use whole wheat flour in your baking, you are going to need more time to let it rise.  

One last thing:  very, VERY important.  The reason why bread rises, is gluten:  a very stretchy molecule, that expands when yeast gives off gas .  Think of the gluten molecules as stretchy, bungee cords.  Whole wheat flour has its bran in it.  If you look at bran under a microscope, you will see that it looks a little like a razor blade.  

Annalena suspects you know where she's going:  you have to be careful when kneading whole wheat bread, to minimize the cutting that the bran does to the gluten.  In her experience, rather than knead the dough MORE than you would white bread (which is what you are taught), you should knead it less.  

There is more information on being a good bread baker within this recipe, so read it.  Pay attention.  Annalena does not say that often, but here, she does, and there are reasons for it. 

Your ingredients:  1.25 cups of cold water, and 1.25 cups of buttermilk.  .25 cups of honey, 2 tablespoons of butter, unsalted, at room temperature;  2 teaspoons of salt.  2 teaspoons of dry yeast. 5.5 cups of whole wheat flour. 

Let's look at the ingredients.  Annalena specified cold water.  Most baking recipes will tell you "warm"  or "tepid".  Why does Annalena say cold?   Well... everyone take out a sheet of paper and write down, privately, what you think "warm" or "tepid" means.   Now, someone collect the answers:

Hmmm... no agreement.  Most bread baking failures happen because people use water that is too hot, and kill the yeast.  Ideally, the water you use should be the temperature at which you would bathe a baby.  Rather than put that responsibility on you, Annalena says:  just use cold water.  Your home is warm enough.  You don't need warm water to get the bread and yeast going. Take cold water right out of the tap, and mix it with...

the buttermilk.   If you are buying your buttermilk at the store, you are buying "cultured" buttermilk, which is not "true" buttermilk, but is fine for this recipe.  "Cultured" buttermilk is 1, or sometimes 2% milk, to which bacteria have been added, to "clabber" the milk, i.e, to sour it.   This is an attempt to replicate REAL buttermilk, which used to sour, simply by sitting around.  It was the liquid thrown off in butter making, and it would be stored, unrefrigerated.  Errant bacteria would find a home, and sour the milk.  You can find this, at farmers markets which have dairy farmers.  Know, however, that there is almost no sourness in this, and your bread is going to be wonderful, but it will not be the same as with cultured buttermilk.   Try it both ways if you can. 

Let us jump to the yeast. If you do not bake a lot, you will buy those little yellow packets that come in threes.  Pay attention to the expiration date.  Another big problem in bread baking failures, is using yeast that died.  Buy your yeast as close to the time you are going to bake, and keep it in the freezer.  It doesn't take up much space. 

Your flour : bread flour or all purpose, whole wheat, please. NOT PASTRY.  Pastry flour has been fine milled, and even if whole wheat, has probably been bleach treated.  It will not form gluten (the bleach kills the precursors to gluten, called glutinin),  and you will not get good bread.  Use that pastry flour for pie crusts. 

Are we ready?  Not quite yet.  Make sure you measure everything precisely.  Bread baking is, ultimately, a bit of a science.  Annalena will tell you when you can be free with things. 

For example... let's say you want a lighter, softer, richer bread.  You can double the butter.  It will take longer to incorporate, and you'll get something a little closer to cake than bread, but you can. 

Let's assume you want a stiffer, harder bread, or you're baking on a very wet day.  In those cases, you can kick the flour up to six cups, but don't add the last half cup until late in the process. 

Mix the liquids, the butter, the yeast, the salt and the flour.  Annalena uses a mixer.  You get a very soft, wet batter:
Let this sit, covered, for an hour and a half.  This is going to make two loaves of bread.  So, first, grease two 8x4 inch pans, and then wet your hands, divide the dough as best as you can, and flatten it in the pans, as best you can
The information on 8x4 pans is very, VERY important.  Many bread pans are available as 9x5 inch pans.  You may be wondering:  what difference does an inch make?  

Those of you who are more geometric will get this right away.  We are working in volumes, and we have to consider lengthxheightxwidth.  All bread pans are essentially 2 inches deep.  Hence, a 9x5 inch pan will hold 90 units.   An 8x4 pan, will hold 64. 
 You see?  We're working with something that doesn't rise very high to begin with,  and we're working with pans which differ by about 33 percent.    Here are some examples of the differences in size


So we've greased our 8x4 inch pans, and put our batter into them.  Now, we're going to cover them, and go away for an hour and a half,  again, and we'll get: 
This is longer than you will need for white bread. And that's ok. At some time during that hour and a half, start heating  your oven to 350.   Put the bread pans in the oven, as far apart as you can.  Let them bake for 30 minutes.   You've already seen what you get:
Let these loaves sit for about half an hour, and then dump them out.   They are going to have some moisture about them, but that will dry off.  Don't eat this bread for at least a few hours.  It needs to rest, and to breathe.    And then... trust Annalena on this one, you are going to enjoy bread bliss. 

Once you have done this a few times, you can play with things, like adding seeds, or raisins, or making a topping of different seeds, and so forth.  Or make rolls (you'll use more butter there, ragazzi), on a baking sheet.  

HAVE SOME FUN!!!!  This is really not much harder than a lot of cooking.  People have been baking bread for thousands of years.  See what you've been missing.   You may hit yourself.


Tuesday, January 20, 2015

One man's trash... Candied citrus peel


You've heard the expression, haven't you, ragazzi?  "One man's trash is another man's treasure"?  Of course you have.  And let's face it:  each and every one of us has, at some point or another, pulled something out of a pile of... oh, clothes, or electronics, or what have you, and made it their own.  Annalena recalls how, several years ago, she mortified the Guyman with such trash diving (although she really didn't need to do any "diving." ).  She and the Guyman were coming back from their annual Christmas eve dinner, very much enjoying "afterglow" and the weather, and as they turned the corner, she saw a huge pumpkin, in perfect shape, in someone's trash.  Seriously, ragazzi:  not a dent, not a rot spot, nothing:  a perfectly good, 8-10 pound pumpkin.  As the Guyman looked away, Annalena reached over, got the beast by the stem, and put it under her arm, to the degree it could fit.  She got her workout that night,  but she got it home.  And a couple of days later, pumpkin soup, pumpkin bread, and pumpkin ice cream all made their way into their refrigerator, and into their friends' gift bags.

And why not?  It was perfectly good food, and someone had clearly kept it from Thanksgiving.

Now, had it been spoiled, Annalena would have left it.  But this was pure .  It really and truly was.  You may not believe her, but has Annalena ever lied to you?


Moving on,  another example of what is "one man's trash," which Annalena has never followed up on, is grapefruit peels.  See, some years ago, Annalena learned how to candy grapefruit peel, using a very complicated, very time consuming method.  The results, based on how her fans react, are phenomenal.  Annalena stopped making her Christmas cookies a few years ago , due to the ravages of age and a busy life, but she still candies the peel, and people do scream for it.  It seems the combination of the color, the mild bitterness ("beaten" out of the peel with  hot water), and the crystalline sugar  "reaches" people in a way.

It should.  The stuff is a pain in the (insert body part here), to make.  The method Annalena uses calls for slicing the peel into chunks, and then boiling it for ten minutes, three times, each time with  new water.  After that, one must clean the peel of residual schmutz, and then slice it into the peel pieces.  These then go into sugar syrup, cook to a temperature of 230  (NOT obtained quickly, ragazzi),  and then cooled, dried, and dipped in more sugar.  Then, and only then, is it ready to eat.

You can only do this when you have plenty of peel around.  Annalena and the  Guyman do eat grapefruit, but it is not their major citrus.  So it sometimes takes a while before she can make it.    And she would like to make it:  sometimes, she thinks she could retire on the stuff.   Her pal June sells it for 11.00 for a two ounce bag, and she has seen it for 16.00 for a quarter pound, with the statement that "it is a bargain."

Hmmm.  Annalena wondered how many pounds of grapefruit peel she could pick up from juice shops.    Then she only has sugar, and her labor to factor in, before she's making stuff that sells for any where from 16-22.00 a quarter pound.  And if you make it, ragazzi, it IS worth it.  Wait.  This is not for those who are not committed.

Well, not having the gumption to contact the juice bars, Annalena's grapefruit peel has been in short supply, and rationed out carefully.  Now, however, she has learned a new method, and it is a method that CAN be used for grapefruit, but has universal applicability, to ALL citrus peels.  As she and the Guyman eat a LOT of oranges (supplied by the Citrus bomb and the Citrus stud), use a lot of lemons (from the same), and use limes and grapefruits, securing sufficient peel is not a problem, if you are looking at MIXED citrus peel.  Think about it:  you can easily, EASILY eat 2-3 oranges a day  (and at this time of year, you SHOULD be).  You probably use a lemon every day or every other day, for flavoring vegetables, fish, or tea,  and you use lime when you drink your bad Mexican beer, or to make guacamole,  and so forth.  And if you want to make mixed citrus sorbet, well, there you go.

So this method is really something you should have in your bag of tricks.  It's far less complex than the one Annalena has used and, remarkably, while you cook the peel together, each variety retains its  unique flavor.  Absolutely wonderful, says Annalena.  So, here we go.

Use peel from organic, or at least non-sprayed fruit, if you can.  Juice it, but don't worry tremendously about getting the white stuff off - that will come later.  When you have a big bag of it (let's say 8-10 pieces of fruit worth), get them all in a big pot, and cover it with water.  Bring it to a boil, lower it to a simmer, and cook for one hour.  (Originally, 50 minutes, but one hour is easier).  Drain this, and let it cool.

Here comes the only part that is a bit difficult.  Take each piece, cut it into a manageable piece, and then, with the back end of a knife, carefully scrape off the white stuff and as much pith as is reasonable.    This will take a while, and to be honest, it is messy, disgusting work.  But we're getting to something wonderful.  We really are.

After you have that done, cut the peel into smaller pieces:  strips, triangles, etc.  You may want to choose different shapes for each type of fruit, and that's fine.    And when you're done, get those pieces into a pot, with a hefty 3 cups of sugar (originally, 3.25 cups of sugar.  If you heap up a 3 cup measure, you will have 3.25 cups) and the same quantity, of water.  If you are making bigger batches, increase accordingly.  Bring THIS to a boil, lower it to a simmer, and let this cook for an hour (again, 50 minutes is what was called for.  ).  Keep the heat at that medium, low level for a very soft simmer.  Now, let this cool, and drain the syrup off.  Save this, the same way you saved the juice if you didn't have "waste" peel,  and use it for drinks, sorbets, cakes, etc.   Lay the cooked peel on racks, with some parchment paper underneath, in order to catch any spill (there probably won't be any, though).

 Leave this in an aerated place, away from your cats, and let it dry for 24 hours.  Let it dry for the full term, because if you don't, after you do the next step, you'll have a mess.  Trust Annalena's experience on this one.    When it's dry, fill a bowl with more sugar, and toss the peel until it coats.  The peel is sticky, so the sugar will adhere well.  Keep doing this until you're done, and then let the peel dry a bit more - let's say for 4-5 hours.   The citrusy sugar can also be used, anywhere you would want sugar.

You MUST store this in a metal tin .  If water or any form of moisture gets to it, your work is for naught.  Metal cookie tins (the ones Annalena used to fill with her goodies), seem to work the best.

This stuff keeps, nearly forever.  It does begin to get a bit more than stiff after 3-4 months, but do you really anticipate having it around that long?  Annalena thought not.  Glorious, isn't it?


So, during this peak citrus season, when you should be getting as much vitamin C as you can, don't let this valuable stuff get away.  And if you have no interest, give Annalena a call. She can use those peels.

Monday, January 19, 2015

Make it simple, but make it new: marinated, salt grilled shrimp

Ragazzi, sometimes we all need to break out of what we usually do or know, and try something different.  Tonight, we are going there, with a dish that has strong Asian overtones. Also, this recipe includes a plea - a STRONG one - from Annalena, on an issue that is dear to her.  In fact, two issues: sustainability, and the need to support our workers at home.

Here, we have a picture of salt grilled, or roasted, or fried shrimp:

That's what we're making tonight, after a tutorial about shrimp.

Did you know that somewhere about 90%  of our shrimp come from overseas?  Maybe you did.  And maybe you knew that these shrimp came from farms. Lately, however, Annalena has learned more about shrimp that has veritably depressed her.

You know how you can buy shrimp as medium, large, extra large, or jumbo shrimp?  Did you ever think about the information behind those sizes?  Well, Annalena just assumed some shrimp grow bigger than others.  She was wrong.

What she learned, in a wonderful article in the quarterly "Lucky Peach," is that the size of shrimp is dependent upon infection at the farms on which they are raised. See, shrimp begin as eggs, and hatch as small, free swimming larvae (Think of "brine shrimp" if you have an aquarium background, or "sea monkeys" if you have one in comic books.  Those babies would eventually grow into shrimp if you let them).  What happens, on the shrimp farms (mostly in South Asia), is that the farm owners watch the mortality rate of the shrimp, which is always high.  If the shrimp are dying at a rate higher than they should be, it's because of infection, and they harvest the living shrimp and start again.  No one knows what causes the infection, but if it starts early in the life cycle, we get medium shrimp.  If later, large.  And so on, and so forth.  In the United States, we never see the "small" ones, which are dried, and sold in Asian markets.

This makes Annalena very sad.  It makes her even sadder, because there are American shrimp industries in the south, and in Maine.  Right now, Buddha be blessed, Maine has shut the shrimp industry so that it can recover.  And the fishermen agreed . (We can ALL learn from Maine on this).  Those shrimp are very small, very sweet, and could not be used in this recipe.  From the Carolinas down to Louisiana, however, fishermen and women go out shrimping every day.  And you CAN buy wild shrimp, rather than farmed ones, if you look. You don't have to look hard.  Fresh direct sells them.  Yes, they cost about a dollar a pound more than do farmed ones.    A DOLLAR A POUND.  How much did your coffee cost this morning?    Annalena, who trained to be a lawyer, rests her case.  So, please ragazzi, look around.  If you can't find wild shrimp at your local market, you CAN buy them on line, frozen (and most shrimp are frozen by the time you get them anyway), and honor Annalena's legacy by buying those.

Okay, sermon over.  Now, let's get to this recipe, which is a tasty one, but it does need some help. Let's go.

  First, a marinade.  It's a simple one.  For a pound of extra large shrimp (about 18-20 to the pound), you need a garlic clove, and here, you need to chop it very fine.  Use a small knife and you'll be okay.  Mix this with 1/4 cup of fresh orange juice.  Annalena wants to you squeeze it yourself:  it's easy.  Cut one or two oranges in half, through the middle. Squeeze each half, pull out the pits.  Measure.  If you have more than half a cup, drink it.  You also need two tablespoons of olive oil , which does not have to be your fancy stuff, a teaspoon of a hot chili sauce of some kind (Annalena uses sriracha, which she has probably misspelled badly), and a teaspoon of paprika.  Smoked is good, but Annalena still had the sweet stuff out from yesterday, so she used that.  And a quarter teaspoon of fresh black pepper.

The orange juice and the olive oil are essentially a vinaigrette here.  The other stuff mixes with them well.  Now, you add that pound of shrimp, which you will peel and, if necessary, devein.  Annalena has mixed feelings about deveining shrimp.  She knows that the vein is the intestine in the shrimp, and it's supposedly gross.   It's never bothered her.    If it bothers you, go for it.  With a lot of shrimp these days, though, the vein is nearly invisible.  As was the case here.    So, toss the shrimp, shelled, and deveined if necessary, in that marinade, and let the shrimp sit for anywhere from two-four hours.  Annalena put hers in a quart container and turned it every now and then, over a period of four hours.

Here is a picture of what they look like, after the marinade bath:


When you're ready to cook the shrimp (which should be AFTER you've cooked everything else for the meal, because this is going to happen REAL quick),  slice up a couple of oranges, and have them ready for plating.    Pour a cup of salt into a big, heavy pan.  Cover the pan, and over medium heat, heat the salt.  You may very well hear salt "popping."  That's not popping, but it's akin to the sound of breaking glass, as crystals of salt break down
 When the salt is hot, take off the cover, and put the shrimp down, in a single layer,


 and cook them for two minutes.  Turn them over and cook for another two minutes.  After one turn:


 Move them to a plate with the orange slices, and... you are DONE!!!!  Unfortunately, the salt cannot be reused:

But the final dish, served with some wonderful accompaniments:

The oranges accentuate the orange in the marinade. There is brown rice with toasted sesame seeds, and also, very quickly sauteed pea shoots.  When the shrimp come off the salt, you need to brush them,but to tell the truth, ragazzi, they WILL be salty. That's why you need acid, rice, and simple greens to go with these.  They are remarkably moist and juicy.  A close up of the split one, at the end of the plate, may show you this.  The salt somehow "cures" the outside, and helps to keep the juice in them - a common problem for shrimp cooking. 

Ragazzi, this is, for just about all of us, our only planet.  And whether we want to acknowledge it or not, we are in fact all united in some way.  Please do something to help your fellow humans, and also the environment. Do your homework before you cook, and yes, it will cost you a bit more.  Get your priorities in order.  We all must and ultimately, this is not very difficult.

Sunday, January 18, 2015

Going exotic : Annalena takes a Frenchman's take on Moroccan: chicken tagine

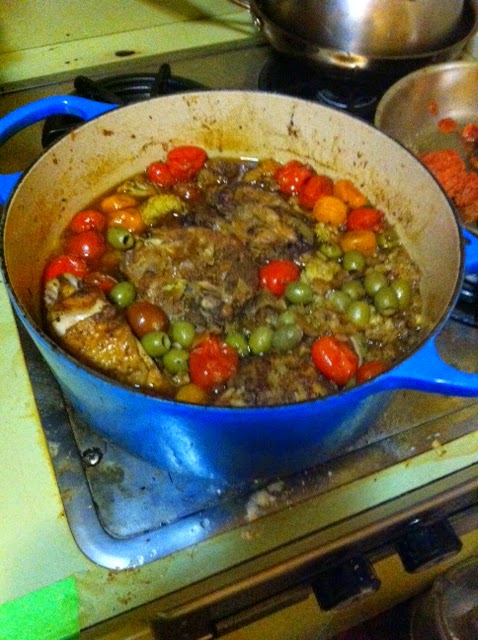
Many European cuisines have a whole family of dishes built on some kind of earthenware pot or pan of some kind.  The pot becomes the name of the dish: paella, for example, and so with this dish:  a tagine (or tajine, or tajin).  You can buy such pots or pans, but you don't need to.  And we won't be using one today, ragazzi, as we make:

Does that look like something you want to make and eat?  It's got chicken thighs, cauliflower, olives tomatoes, and tons of aromatic spices in it.  Still with Annalena?  Unlike many of her recipes, this one is gonna involve some work, starting with the spice mix, which you're going to make yourself.  It looks like this when it's done:
To make it , Annalena reckons you're gonna have to do some shopping, because there is quite a list.  Check your spice cabinet, to see if you have: sweet paprika,  cinnamon, coriander, tumeric, ginger, cardamom, and allspice.  You're going to need ALL of them.  You will NOT need the garlic powder that the original recipe calls for.  Garlic powder?  In Annalena's house?  REALLY?

Ok, so  you have the list of spices, and here's the quantities.  And there's a lot.  You need 3.5 tablespoons of sweet paprika, to begin.   Here, ragazzi, is one of Annalena's digressions.  To speak of "paprika" is to say something like "bread."  Ultimately, paprika is dried, powdered, red pepper.  There are as many paprikas as there are peppers, and they are hot, sweet, mixed, blended, etc.  When Annalena shopped at the much missed H. Roth emporium, there was a paprika wall:  you told the clerk what you were cooking, and he or she told you which one to get.  Today, you have to just wing it, or find someone who knows their peppers.  If all else fails, for this one, either get "sweet Hungarian" paprika, or "pimenton dulce" if you are fortunate enough to have a supply of good Spanish spices.   The amount - 3.5 tablespoons - is just under 1/4 cup.  So, if you have a dry measuring cup of the appropriate size, use that.  Otherwise, spoon it out into a bowl.    You add 2 teaspoons of the cinnamon,  3 TABLESPOONS of the coriander, 4 teaspoons, or a tablespoon and a teaspoon, of tumeric one tablespoon of ginger, half a tablespoon (1.5 teaspoons), of cardamom, and 2.5 teaspoons (you can cheat and go up to a tablespoon) of allspice.  All of these, ground.  Mix them together, and toss them in a small frying pan, and toast them for two minutes.  Stir them every 30 seconds or so, and then pour them back into the bowl.  Your kitchen is going to start smelling really, really good.

Next you need chicken thighs, on the bone and with the skin.  You need 3 pounds, which is about 8. On this point, please do not be compulsive about the NUMBER of thighs.  If you have a knife, you can work with them to make them about the same size.  This is important for when you shop, because ultimately, if you have to decide between 8 and 3 pounds, go with the three pounds.  Chickens come in different sizes, and some are like Twiggy, and others are "THUNDER THIGHs."  It  may take some looking to get the thighs with bones and skin, which is a shame.  Welcome to today, kids.

Anyway, get the chicken thighs, and mix them with some salt and pepper, two tablespoons of the spice mix, and two tablespoons of olive oil.  Coat them well.  You get something that looks like:
So now, you're saying "WAIT. I just shopped, mixed spices and I'm using TWO FREAKING TABLESPOONS?"  Well, in a way, yes, ragazzi.  Here's what we're going to do.  We're going to add some more of this down the line, but this is optional.  Once you taste it, however, Annalena thinks this may become one of your "go to" blends with stews, ragus, goulashes, etc.  

Put a quarter cup of olive oil into a big pan, and warm it up.  Add the chicken, skin side down, and brown it, on the skin, and non-skin sides.  This is hard to tell, because of the color from the paprika, but here's a shot:  
Cooking them all the way through, is not all that important, because there's another 40 minutes of cooking ahead of us.    Put them aside, and turn off the heat because...

Now we're going to make the vegetables.  Yup, the vegetables.  Cauliflower.  A whole head.  Break it into florets, and get the florets into some boiling salted water.  Let them cook for three minutes, and have some ice water ready.  After three minutes, get them into the ice water.  Undercooking is better than overcooking, because this, too, is going to cook for a while,  but raw will not work.  We have some spices that need to get into the veggies, remember.

After you've done the cauliflower, get a cup of cherry tomatoes.  (the original recipe called for plum tomatoes. Getting a good plum tomato this time of year is impossible. Cherry tomatoes are easier).  Drop those cherry tomatoes into that hot pot of water for half a minute, and get them into the ice water.  Separate the veggies, and let them dry.

We'll come back to the tomatoes, but now, we're gonna cook the cauliflower.  If you have some oil left in the pan, heat it up, and toss in the cauliflower.  If you don't, add a few tablespoons.  Brown them, and then take the chicken and the cauliflower, and get it into a big, oven safe pot:
NEXT STEP ( she told you we were going to work).  Chop up a large onion, and three cloves of garlic.  You also need to grate about a tablespoon of fresh ginger, and get a pinch of saffron (Annalena forgot to put this on your spice list).  Put all of this into that hot pan, again augmenting with oil if you need to.  Keep it moving for about five minutes.  Then, add a tablespoon of tomato paste, and two cups of chicken stock.  Raise the heat to high, and reduce this by about a third.   When you've done that, put that in the pot with the chicken and cauliflower .  Here's a peak at what the onion mix looks like when it's ready:
You feel like we're working yet?  Annalena bets you do, but it's not hard work, it's just a lot of it.  Bear with her.  You can't get food like this outside.  Unless you have a Moroccan friend who is a good cook.  

Put the pot into the oven, covered, and cook for twenty minutes.  After you've done that, take it out of the oven, and add a cup of green olives (with or without the pits, up to you.   Think of who's gonna eat it),  the tomatoes you cooked before (we didn't forget them), and the chopped rinds of two preserved, salted lemons.  You'll have to put those on your shopping list too, unless you have some, because while they are easy to make, they're not  ready to use for 3 months.   If anyone has gotten this far and wants to know how to make them, ask Annalena.   You need salt and lemons.   The tagine, after twenty minutes, and after the introduction of the olives et al, looks like:
Another twenty minutes later, and  - Allah be praised - you are DONE:

Doesn't look much different, but the tomatoes have shrunk the chicken is much softer, and it really, REALLY produces an amazing liquid.  At this point, add some more of the spices if you like.  In fact, early on, if you wanted to, you could add some when you cooked the cauliflower, and/or the onions. Annalena did so, and suggests you do that instead of adding it at the end. 

Save the rest of the spices for the next time you make this, or have a recipe  that calls for "za'atar." This is not za'atar, but it will suffice.  And make this dish, ragazzi.  Yes, you have to shop, and yes, you have to work, but be nice.  How many easy ones do you have from Annalena?  Get into the habit of something fancy, and expand your horizons, too.

Variations on a theme: riffing on lasagna

This one, ragazzi, is by popular demand, seriously. And Annalena wants to take the time first to thank her readers for making clear when they want something  (BLOG IT!!!!!)  came, for example, from the lovely and talented Christa.  Second, she wants to use this post to discuss how, once you master te basics of a recipe, you can play with it, and it becomes a recipe without a recipe.  She will also go over the mysterious history of lasagna.  Happy Sunday everyone.

See, we do not know the exact origins of lasagna.  We do know that Romans ate something along the lines of what we now know as lasagna:  there were strips of a very rough pasta, mixed in with a chickpea mash, and whatever else could be found.  It was, essentially, food for soldiers on the march, and, given what Annalena knows, positively vile.  It also contained no tomatoes.  All of her readers should know by now that tomatoes did not enter the vocabulary of Italian cooking until after Columbus' and the voyages to the West.

Today, of course, it is very different. We all know lasagna.  Or do we?  Generally, in Annalena's experience, we know the traditional red one, with meat sauce, a heavy bechamel,  and lots and lots of cheese.  A lasagna that can render you immobile for a day or two.  That is how Annalena's Nana made her lasagna.  It was wonderful.

Annalena still makes a similar lasagna, but she leaves out the meat.  She is more likely, however, to make a dish that is lighter, and plays with vegetables, like this one:

This is not a light lasagna, but it is meatless.  The color comes from butternut squash.  And Annalena is going to TRY to tell you how she made it, but to be honest, she sort of wings it with lasagna at this point in her life.  Make a few, and you will too. 

First, let's start with the noodles:  you can get fresh lasagna noodles, and you can get dried ones.  Fresh ones will make a lighter product, but you can't always find them.  You can use dried ones and get a REALLY good lasagna:  this one was.  DO NOT USE THE NO BOIL  noodles.  They are vile.  They are disgusting.  They will make you wonder "why did they ruin perfectly good pasta?"  

Annalena is not ambiguous about this whatsoever.    Boiling lasagna noodles takes no time at all, especially if you follow her method,  and you will be happy.  

When you are making a lasagna, check how many noodles you will need to cover the pan you are using.  This will determine how many layers you can make.   If , for example, you have twelve noodles and the pan takes four (a usual scenario), you can only get two layers:  you need noodles at the top, remember?  So, if you want a super layered lasagna, buy extra. 

You need a lot of ingredients here, but you can collect them over any period of time you like.  Just wait to make the bechamel until the day you're going to make the whole thing. 

This time around, Annalena used  both butternut squash puree, 
and  roasted slices of butternut squash, for texture.  (She also used greens, but we'll get there).

To make the squash puree, cut up a BIG butternut squash (not necessarily as big as this one):

Put the pieces skin side up on a sheet pan covered with parchment, and then roast it at 400 for at least half an hour.   You can check to see if it's soft enough to puree, by pushing with a fork or a big spoon. If it collapses, it's ready.  When it's cool, scrape the flesh off the skin (you CAN eat the skin, but let's stick to basics here),  and puree it in a food processor.  No liquid, no butter, no nothing.  Just pure squash. This monster yielded six cups of puree, and the lasagna took half of that. 

We're not done with squash though.  Now, get a medium sized one - about two pounds.  Peel it, cut it into slices, like half moons, toss those with olive oil and salt, and roast them for about half hour, also at 400.  When you see browning, it's done. 

What is a lasagna without cheese?  Not lasagna, in Annalena's book.  We're going to use GOOD quality ricotta - recite after Annalena:  "good ricotta does not end with an -O", fontina cheese, mozzarella,  and parmesan.    We'll need a pound and a half of the ricotta,  a half pound of the fontina, one pound of the mozzarella, and what you want on the parmesan. 

These numbers, ragazzi, are improvisations.  You will want the ricotta and the mozzarella, but if you can't find, or don't like fontina, get something else, or use more mozzarella.    And if the quantities of the solid cheeses (the mozzarella and the fontina), bother you, change them.  You WILL need the ricotta. 

Now, to the bechamel, and this is where Annalena loses people.  Melt a stick of unsalted butter and mix it with a half cup of flour.    Whisk that together, until you've got a solid mass.  Don't worry, you're fine.  Now add three cups of milk, slowly.  Many recipes say the milk must be warm. Annalena doesn't see a difference.  Hot milk means another dirty pot.    Just pour it in, and keep whisking, at low heat.  Eventually, you'll get a very loose looking custard.  Add some salt.  This is one of the mother sauces.  Annalena's people call it beciamella.  Put a cover on it, and put it to the side, because now, it's time to work. 

Cube those solid cheeses, and keep them separate.  Put the ricottta into its own bowl.  So, at this point you have: 

1.  a quart or so of beciamella
2  a pound of mozzarella, cubed
3. a half pound of fontina, cubed
4. a pound and a half of ricotta that doesn't end with an -O
5. lots of squash puree
6 roasted squash
7 a pound of noodles

You still with Annalena?  Because now, like Stephen Sondheim, we're gonna put it together, bit by bit.   

Get a large pot of water boiling and salt it.  If you are going to add greens to your lasagna, now is the time:  put them in for about three or four minutes, pull em out, run them under cold water, and chop them. Annalena used dandelion.  Spinach is traditional, chard is good.  Annalena does not like kale in hers, but it's YOUR lasagna.    Also, if you are prepared, you could make those greens ahead of time. Or if you have some extras from another cook. 

Remember how we determined how many noodles will be necessary to cover a pan?  Well, now we'll see why.  Take that many noodles, put them in the pot, and cook them for NO MORE than 4 minutes, if you're using dry.  If you're using fresh, 30 seconds.  Before cooking them, put a few spoons of the beciamella in the pan and cover the bottom. Now, put those noodles in. 

Let's make our first layer.  For Annalena this time, it was a half pound of ricotta, a cup of squash puree, about a third of the mozzarella, and a cup of beciamella.  Mix that all together, and spread it over the noodles.  You don't have to be precise, but make it go as far as you can. 

Now, do the same number of noodles.  When they're done, we go to layer number two.  This time,  the roasted squash, half the fontina, another half pound of the ricotta, and another cup of beciamella.  Spread it again.

Third verse/same as the first.  You do the same number of noodles.  THIS time, mix  the greens, the butternut squash puree (another cup), a cup of beciamella and another third of mozzarella.  


And we finish up, with another layer of noodles, and by mixing everything that's left together, and pouring it over the whole thing.  Put that in the oven, at 400, and let it cook for about half an hour.  If you can fit it on a baking sheet, that's even better because it may drip.

Remember that parmesan?  AH, Annalena knew you did.  When the lasagna is finished, get out a cheese grater, and put whatever amount you want all over it.  That way, you don't burn this lovely stuff.  

And there you have it.  Squash lasagna, with room for improv.  Let's have another look at it:

Ok ragazzi, now it's your turn.  Get to work and play with this.  Annalena wants to know what you do ok?  So do we all.


Thursday, January 15, 2015

Speculating on speculoos: a Belgian cookie, frequently claimed by Dutch

There is a common saying among folks who cook, and those who don't, that cooking is an art, while baking is a science.

Well, as someone who does both, Annalena wishes to say:  yes and no.  Indeed, the belief that you can substitute things in cooking is true.  But it is not an absolute.  As she points out, over and over, if you are making a recipe that calls for whole milk, in many cases you can get away with 2% milk, but not skim.  But not always.  Similarly, if a recipe calls for cashews, which are rich and unctious, and you substitute sunflower seeds (do not laugh.  It has happened), you had best be prepared for disappointment. Sometimes, you can substitute parsnips for carrots (parsnips make a wonderful cake).  Other times, you cannot (try passing off parsnip soup as carrot soup).

It is true, to a much larger extent, that you cannot substitute freely in baking.  For example, if you decide that you're going to be "healthy" and use honey instead of sugar in a recipe, first of all, you're not being healthy, and second of all, you'd better get ready for a fall.  On the other hand, in some cases, the amount of freedom you have is quite large. Let us say you are making oatmeal raisin cookies, and you don't like raisins.  Know what? You can put in chocolate chips instead.  Or nuts.  And the recipe will work.  If you are baking bread, and you wish to add some whole wheat flour to make it a bit healthier, it will work. You can't expect 100% substitution and the same product, and you may need to let the dough rise for longer, but you will get VERY good bread.

All of this is by way of an object lesson, ragazzi, as Annalena describes her adventures in making the cookie known as speculoos.

"Speculoos," strictly speaking, is a spread:  sort of the anti-nutella, for those of us who prefer spice to chocolate.  There are different mixes, but there is always cinnamon (a LOT of cinnamon), and ginger (a LOT of ginger too).  Then, there are additives.  You can get some on amazon.com.  It makes amazing ice cream, and it is terrific on bananas.

There is also a cookie called "speculoos" and sometimes called a "biscoff" wafer.  There are different variations of it.  For example, there is one where one uses a springerle mold to roll out etched cookies.  We will not be making that here.  There is also one where you roll out the dough very thin, cut it, and decorate it with sugar and white chocolate.  We will not be making that one either, ragazzi. Rather, we will be making a simple, log cookie and we will be seeing how variations and carelessness, can indeed, change your baking.  Also, we will learn how you can't judge how a recipe will turn out, by its picture.

What follows is a picture of the cookies which were to come from the recipe Annalena followed:

What that picture tells an experienced baker, is that this is a cookie which spreads in baking, like your basic butter cookie.  Chocolate chip cookies fall into this category:  you know they spread.

Now, here is a picture of what Annalena got on her SECOND run through this recipe:

Again, an experienced baker will say  "these cookies did not spread."  Indeed, they did not.  They behaved much more like a shortbread.    Does that mean Annalena did not follow the recipe?  No, it does not; however, she is now going to show you a picture of a batch she made, where she did NOT follow the recipe in a significant way:
Very different, yes?  Anyone have any idea of what she did wrong?  It's subtle.  But we will get to it.  It's an important object lesson in how to follow instructions and NOT to guess.

First, let's make some battter.  You need a stick of unsalted butter, at room temperature . Put that in the bowl of your mixture,  and start working it with a paddle, until it's nice and blended:  maybe two minutes.  While that is happening, combine 2 cups of all purpose flour, a full tablespoon of cinnamon,  a teaspoon of ginger, about a half teaspoon of fresh greated nutmeg, and  a  half teaspoon of ground cloves. Also add half a teaspoon of salt. Put that aside.

Into that creamed butter, add a half cup of brown sugar (light or dark), and a quarter cup of white sugar, and 2 tablespoons of molasses.  Work that for another three minutes.  Then add an egg, and a bit of vanilla.  When that is all combined (stop the mixer and get in there and stir it with a spatula if you need to),  add the flour and spice mixture, and blend it until it all comes together.  

Annalena did exactly this , both times.  BUT... here's where she had her issues.  Once you have the batter, you are to divide it in three equal parts, and roll each part into an 8 inch log.  The recipe is very clear on this.  Here are Annalena's first logs:

If you have any doubts as to their length, Annalena lined them up next to her 8 inch santoku knife:
OOPS.  Well, she went ahead with the recipe anyway:  each log was wrapped in foil, and frozen for at least 3 hours.  After that, she cut each log into about 30 cookies, placed them on a cookie sheet, and baked at 375, for 12 minutes.

You saw what happened.   The ones that aren't burned, taste wonderful.

Later in the day, she pulled out an 8x8 pan to measure the logs she made.  You can tell the difference:

She wrapped these in foil, just like the last batch, and let them freeze, for three hours.    When it was time to cut the cookies,  just like the last time, she took one log out at a time, and cut the cookies,  disregarding the instructions saying you needed 32 per log.  Who cares?    And, given the large degree of burning,  she reduced the baking temperature from 375 to 350.  She got cookies that taste great,  look very good, and did not burn.  As our final illustration, we have the first and second batches below:
You can tell which is which, can't you?  The ones on the bottom will get repurposed in a pie crust or something like that, and the ones at the top:  cookies for the Guyman and Annalena and friends. So, the lesson here, is NOT TO EYEBALL measurements, especially when you are making a recipe for the first time.  And to recapitulate, you have the ingredients and how to mix them above.  Form three 8 inch logs (MEASURE THEM!), freeze them for 3 hours or more, cut thin slices off of the logs, and bake them on parchment paper lined sheets for 12 minutes. 

Who needs nutella?


Rolling with the seasons: black cod in parchment, with olives, potatoes and lemon

Any of her amici who have read even 3 of these posts knows that Annalena is loyal to her farmers, her local bakers, and her fishermen, none more so than the Karlins (although she wishes WK would get rid of the ridiculous pony tail.  NO  It does NOT make you a shaman).

Still , there are times during the year, when it is not possible to be loyal:  it's winter, the ground freezes.  The weather precludes travel, the seas are too rough.  And so it was this past week, when Annalena had to do what she does not like to do... and go to a fish store to get her piscine foodstuffs.

She and the Guyman were laughing because, when this happens - always in the bleak midwinter,  it always seems that the sequence is:  halibut, black cod, octopus.    We've been through the halibut, and now, we're on the black cod.

But let's stop for a minute, because the very name "black cod" should be used as a teaching tool for all of those who are so inclined.  "Black cod" is not a codfish.  It is not even CLOSELY related to a codfish.  And it is not at all like a codfish.  So it is with fish, ragazzi.  DO NOT trust a name.   What is called a bass, is often not a bass, what is called "dolphin," is not dolphin, and so on and so forth.  If you encounter a name that strikes you as odd, do some research.  Chilean seabass, for instance, is NOT a bass.  Surely you know the story:  it's true name is "patagonian toothfish."  Try selling THAT.  Chilean seabass... OH, why didn't you TELL me?

The better name for black cod, is sablefish.  Doesn't sound like anything you've heard of?  GOOD.  It shouldn't, because as far as we know, sablefish is the only representative of its species that is around today.  It comes from Northwest US waters, and it is a deep, and Annalena means DEEP water fish - 1000-9000 feet.

A fish that dwells at that depth of the ocean is going to need some specialized tissues, etc, and sablefish does have those.  To be more precise, it has a very high fat content - GOOD fat content, somewhat akin to wild salmon (we speak not of farmed fish in this blog, ragazzi.  EVER).   Yet, that fat does not come across as "fishy" the way, for example, bluefish or mackerel might.  This is a very luscious, thick fleshed, helluva good fish.  Cod is wonderful in and of itself, but if you put North Atlantic cod on a plate next to sablefish, and tried them both, you would know immediately:  these fish are NOT related.   Annalena cannot conceive of deep frying sablefish, any more than she can conceive of preparing North Atlantic cod with a miso glaze.  Yet, each technique is valid, for a particular fish.  Do your research, ragazzi, and then do not say "I can't cook fish."

This particular dish comes out of a classic technique we've seen before:  "en papillote" or "in paper."  Annalena uses parchment, however, she is told that in France, the paper of choice is a brown paper bag.  And if all else fails, foil can be used.  The advantage of cooking this way, is that you save everything, and the temperature concentrates so strongly, that you can cook your fish in very limited time,  with very little work.  Clean up?    Throw out the paper.    So, what are we waiting for?  Let's get moving.

The proportions here are not precise, because cooking often is not.  You need a sufficiency of the sablefish, cut into portions.  Five ounces, six ounces, eight ounces?  How hungry are you?  That's the size of your fish portion.  Next, you need some potatoes, and here, the choice of potato is somewhat important.  You want something that holds up well when boiled:  that means just about all red skinned potatoes,  and yukon golds, just to start. (DO NOT trust a supermarket selling "boilers."  Ain't necessarily true).  You want about 3 ounces of potato per person.  That may very well mean you are using one potato for two people, or even three. That's fine.  Peel the potatoes, and then slice them REAL thin.  A benriner, or mandoline, are both great to have for this.  If you don't have those tools, get a good knife and here, ragazzi, you do need to be surgical. Get them as thin as possible,  almost like potato chips.   Put them in a bowl, with two tablespoons of olive oil, and some chopped oregano .  You can use thyme or rosemary if you have to .  You want to stir this all up so that the potatoes are lightly coated.  If you need more oil, but it in.  Don't go crazy with the herbs: less is more.  Annalena would say that half a teaspoon per person is probably plenty.

You will also need a nice sized garlic clove for every 2-3 portions.  Peel it and slice it thinly. Also, slice a lemon, meyer or not, into thin slices, and finally, get a  handful of black olives.  Pit them by smashing them to release the pit, and then slice those, too.

Did Annalena say finally? She lied.  Now, a good handful of parsley, chopped.

Ok, now we're ready to start the assembly.  First, get your oven going at 400, and get a big baking sheet ready.  For each portion, you need a separate sheet of paper.  In the middle of that paper, make a rough circle of potatoes.  You know how many potatoes you have,  and you know how many people.  Act accordingly.  Put the fish on top of that, and then strew garlic, olives, and parsley.  End with some lemon slices, and a pinch of salt.

Here's what Annalena's looked like:


Now, seal that paper up really, REALLY well.  It's important to make sure that it doesn't, and can't, open.  Some recipe writers say to tie it with kitchen twine.  Annalena says screw that, and crumple the paper up tight.  If you are really going to be certain about it, you can dab some eggwhite on the edges of the paper, and then fold it together.  Egg white is "nature's glue," and it will hold things together.

Put the packets onto the  baking sheet, and then bake them for 15-20 minutes, at 400.  To Annalena's taste, 15 minutes was fine.  Go to 20 if you really do not feel secure about undercooked fish, although if your oven functions correctly, fifteen minutes will be fine.  Given the nature of this fish, 20 minutes will not overcook it.

When all is said and done, you have:


Your hardest task at this point, is to get the fish from the paper to a plate, if you so desire. Sometimes, Annalena just cuts away the extra paper, and serves it as it is.   Then, at the end, you crumble up the paper and your clean up is complete.

So, when Wade and his ponytail ain't there, and you have to do what you have to do, you could do a lot worse.

Annalena really does love her gephew  Wade.  The ponytail, on the other hand.....