Sunday, October 25, 2015

Rollin... Rollin... Rollin to the oven: Eggplant rollatini.rollrolro


Ragazzi, you have heard of eggplant rollatini, no?  It's kind of a standard dish on any Italian restaurant, especially one that features dishes from the south.  And it's also pretty much all over the menu of Italian American restaurants.     What Annalena finds surprising is that so few people make it at  home. And she's as guilty as anyone else in not making it. Well, while we can still get eggplant, and it won't be too much longer, ragazzi, let's make some.  It's nowhere near as involved as eggplant parmagiana, and there's no frying.   It's a good change of pace, it's filling, and you'll feel SO pround of yourself when you make your substantial vegetarian meal, and learn a few skills along the way.

Did you know how eggplant got its name?  Well , the original eggplants, were white.  Yes they were.  The purple ones were a sport mutation, as they are called.  They became more popular, and crowded out the white ones, because white eggplant show their bruises and their damage more easily than do purple ones (this is the same phenomenon that limits our access to yellow tomatoes, which are the originals, or to white peaches, and other light colored fruits and vegetables).  In the case of eggplants, Annalena is told that white ones are sweeter, but she cannot tell the difference.  And since she doesn't look for sweetness in eggplant (although some feel you can substitute eggplant for banana in many banana desserts:  eggplant split anyone?  Annalena thinks not), she doesn't pay any attention to this distinction, but gets the eggplant which suit her purpose.

In this case,  medium sized purple ones do just fine.

Annlena chose the eggplant for their length, because she wants long slices that she can roll up.  the one on the left is better at this, but she gets different sizes so that she can do a better fill on her baking dish. 

So we have our eggplant, and we have just turned on our oven to 400.  Now, we are going to make vertical slices of the eggplant.  THIN ones, but not paper thin. Then, we are going to toss them with a little olive oil:

You can see how at least one slice has soaked up more than its share of oil?  This is ok.  Annalena does not salt, nor drain, her eggplants.  Yes, the standard wisdom says you do this to drain the bitterness, but Annalena doesn't taste it.  So she goes forward.  After you've sliced and slicked your eggplant, also oil a grill and get it nice and hot.  Then, start adding your eggplant slices:
You do  not HAVE to grill them:  you are simply trying to get the slices pliable. Annalena finds that grilling them gets them done faster than baking, and adds a layer of smoky flavor.  If you want to bake the slices, however, make sure the oil coat is good, oil the baking sheet, and roast at 400 degrees for about five minutes, and then turn the slices over and do them again.  For grilling, 3 minutes to a side is plenty:  get the degree of grill marks you like
You can stack them on a plate, and this will help them steam, and become more pliable
Eggplant done. Now we have some fun.  Keep in mind that you have a lot of leeway here with your filling. Annalena likes three cheese:  ricotta, mozzarella, and fontina cheese.  She cubes the mozzarella and fontina, but does not go crazy dissecting the pieces for eveneness  

Take a slice of eggplant, and put a goodly spoon of your filling (and again, use what you like, just season it well), at the thickets end of the slice:
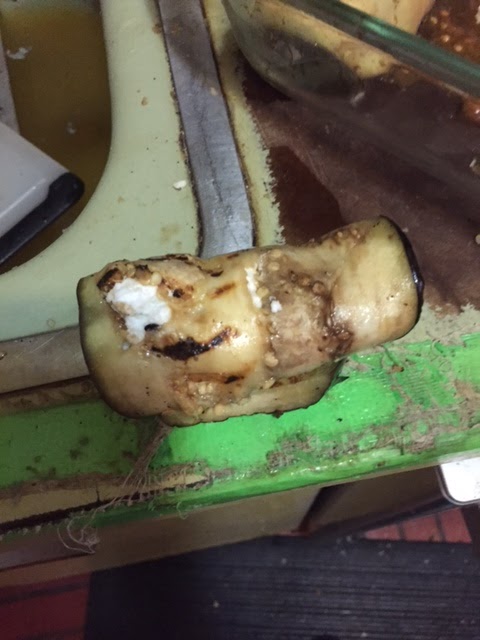
Do you see how there's just a little bit of uncoated vegetable at the top? Well, that's your tab for rolling. This filling is thick, so you don't have to worry about "ooze," and in any event, ooze is good here. Roll from the top down and try to make sure you get a complete roll:
As you roll these, you put them in a baking dish, with a little tomato sauce on the bottom.  Keep stuffing until you run out of eggplant, which will probably be before you run out of filling (Annalena used a pound each of mozzarella and ricotta, and half of fontina:
Cover this with any tomato sauce you have left over, and also with any leftover filling.  Put it in the oven, and bake it, for forty minutes, at 400.  At the end, run it under the broil selection, for two minutes, and you get before you put it in the oven: 


And after it comes out of the oven:
Very easy, and very good.  Annalena wants to eat it now.  You can serve this up with some green salad and be very happy.  You can serve it up with some simple pasta, and be even happier.  So, what are you waiting for? Frosts are coming, and the eggplant will be gone.  Do it NOW. Annalena exhorts you to do so. 

Ain't nothing like the real thing: REAL Sicilian pizza: sfinciuni (or sfincione)

Ciao, ragazzi.  Today, we are continuing Annalena's working through "what she learned in Sicily" with what is called sfinciuni, or sfincione, depending on who you ask.  If you look at the picture above, and you begin thinking "that looks like Sicilian pizza," well, you are close.  Indeed, the evidence points to this being the jumping off point, for what we know of as Sicilian pizza.  Trust Annalena, ragazzi, this one is SO MUCH BETTER.  And easier.  

Now, Annalena knows that there are those of you out there, who have tried to make "Sicilian pizza" and have failed.  Can she see a show of hands? Hers is up... Yup, And we all have various reasons for the fail.  Annalena, in researching this recipe, now knows why.  And she has a solution:  make sfinciuni.

Annalena found this wonderful stuff all over  Sicily, although those who know say that it originated in Western Sicily.  For those of you who are thinking  "WESTERN Sicily? Oh, PLEASE," Annalena begs that you check a map.  Sicily is a BIG place.  As she received her comeuppance once about Mexico, she is urging you to think a bit globally here:  there IS a Western Sicily, there IS an Eastern  Sicily, and while there are similarities - many of them - do not equate the two.    The reason for making this distinction, is that while recipes for sfinciuni dough are similar, the toppings change.   What you have, in this one, is a typically Western style topping, except that Annalena left out the anchovies.  You see the ingredients for the topping below, and they're here, because you want to make your topping first:


Traditionally, there are anchovies in the topping.  Annalena and the Guyman are not big anchovy fans, and as this was Annalena's first, she wasn't going to risk it. Instead, she doubled up on salt preserved capers, which you can see in the back, soaking to get their salt off.  You also see tomato paste, because the sauce Annalena had was not very thick, and her estratto had, well, fermented.  You will also see olives - not traditional, but hey... These are the last of some spicy olives she had.  She pitted them, and chopped them.  You also see bread crumbs - that seems to be standard for sfinciuni recipes, and you also see grated pecorino cheese.

We are going to take a digression here, ragazzi, about pecorino cheese.   You are probably familar with "pecorino romano."  Mind you, that is only ONE of the varieties of pecorino, which simply means "little sheep."  When she went shopping today, Annalena found 13 varieties of pecorino at her Italian market:  pecorino with saffron, hot pepper,  fennel seeds,  young pecorino, aged pecorino, etc.  Much of Italy is mountainous, and while sheep and goats can do quite well in mountainous terrain, cows do not. That is why, when you find a beef recipe, ragazzi, it is almost certainly from Tuscany, where there is more even flat land than anywhere else.    So, when you are shopping, here is a way to test your cheese monger. Ask for pecorino.  JUST pecorino.  If s/he asks "what kind of pecorino?"  stay with that shop.  If the shopkeeper asks  "what are you going to use it for?"  bring your friends.  If, on the other hand, you are asked "do you want it pregrated?"  Find another store.  If you're not willing to grate your own cheese..

Ok, diatribe over.  You mix all of these things together:

We are doing this now, because  your dough is going to rise WITH the topping on it.  This is a peculiarity of some bread dishes.  This allows it to permeate a bit into the dough.  It's a good idea.

So, let's go to the dough.  Essentially, this is a bread dough.  You need a hefty 2 cups of unbleached white flour , and half a cup to 3/4 cup of  durum.  Here, you could use rougher semolina flour.  Combine that , and leave it be for a minute, as you add a cup of room temperature water, a tablespoon of yeast, half a tablespoon (1.5 teaspoons) of salt, and 2 tablespoons of olive oil to a bowl. Then add your flour.  Mix it with a dough paddle (see below).  After one minute, your dough is going to look like:


And after 5 minutes, you get what you want:


This, ragazzi, is your dough paddle, as compared to your dough hook.  Normally, we use the dough hook to make bread dough.  We don't do that here, because the durum is very high in glutens, and we do not need the force that the hook brings to things.  Just a nice mixing action.  Use this tool when you make pizza dough too. 


Now, we come to a VERY important point in making this, and any baked product ragazzi.  Here, we are going to coat a metal, 9x9 pan, with olive oil, put the dough in, and push it to the corners.  Be patient:  the dough is a bit elastic, and it will resist.  Be gentle, be consistent, and it will happen:


Annalena now has to discus two points.  First, this recipe calls for a 9x9 inch pan.  This pan is 2 inches deep.  So, the volume of dough to fill that pan is 9x9x2 cubic inches, or 162 cubic inches.  You need to keep that in mind, if you change pans. So, for example, if you are using an 8x8 pan, which is 2 inches tall, you have a volume of 128 cubic inches.  Your bread will rise very high, and you will need to cook it longer.  It is unlikely for you to size DOWN; however, many people, not having the right size pan, move UP.  Bad thing to do, ragazzi.  Let's assume, for example, you decide to use your baking sheet, since after all, that's what pizza shops use for Sicilian pizza. 

A baking sheet is 13x18x1.  Hence, you have a volume of about 240 cubic inches.  You don't have enough dough, by half.  So you have to kick the amount of dough - and topping up.  And if you want something that rises 2 inches tall, now you need 480 cubic inches of dough.  Hence, you need to triple the amount.  Working with 9 cups of flour is not impossible, it is just difficult, and your mixer will not accommodate it.  You will need to do it in two batches.  Triple everything but only double the yeast.  There are reasons for this we shall discuss at another time.

Also, the choice of your pan is important.  Metal holds heat better than glass, or ceramics do. As a result, the outside crust of your dough will be crispier, a bit more "burnt" in a metal pan, than in glass, and definitely moreso than ceramic.  Keep that in mind if you have an option.

After you've spread out the dough, and spread the topping on it, sprinkle some dried oregano on it.  (This, too, was one of the universals.  There was oregano on all versions of the sfinciuni Annalena saw).

You need to let this rise now.  This is how it looked after an hour:
And after 2 hours:
And after four:
There is a decided drop in how much more the stuff rises after the first two hours.  You WILL get more rise, and a lighter finished sfinciuni, if you let it rise more than two hours, but you don't have to.

Get it into a preheated 350 degree oven, and bake for 45 minutes.  You get:
This final picture allows Annalena to give you a final admonition, which is not to make the mistake she did.  There is a crevice reminiscent of the Grand Canyon right in the middle. That is because Annalena decided to remove this from the pan, while it was still hot.  BAD BAD BAD.  There is no reason to take it out of the pan, and if you do, well, let it cool.

Once this is done, do NOT refrigerate the leftovers.  And note that this is not a bread that is going to keep for long.  If you make it today, you should eat it today, and if not, by tomorrow, or toss it.  It would be a shame to waste it though, so if you're not going to finish it, share it.

If you make this, ragazzi, and use a different topping, please share that information with us.

Next time, we make one of the most ubiquitous of all Italian dishes and, when done correctly, one of the most exquisite:  eggplant rolatini

Thursday, October 22, 2015

Rolling with everything: cauliflower goat cheese casserole

Today, ragazzi, we are going to be making a dish that ultimately, is simple.  Along the way, however, we are going to learn how to deal with "kitchen surprises" and also how to organize our time, and get things ready.  Now, if that doesn't sound pedantic, what does?  Trust Annalena: you will thank her at the end of this.

This is the time of year when Annalena starts casting her thoughts to holiday meals:  the biggies:  Thanksgiving, Christmas and New Years.  So she looks for dishes that are both festive, and easy, and also work with what is seasonal.  Cauliflower will be with us for a while now, so it's a perfect choice.  And when Annalena saw a recipe from one of her favorite cooks, which also featured a festive note, of goat cheese, she thought this would be fun.

Ah, it was.  But along the way, there were, as they say among certain circles  "teaching moments."  And we will explore those as we cook.  At the end, you get what is at top.  Now, doesn't that convince you to try cauliflower?

So, we begin with the recipe and the ingredients.  It calls for  "1 medium cauliflower."
Ragazzi, do you HATE instructions like this as much as Annalena does?  What constitutes a "medium" cauliflower?  Do you know?  Annalena does not.    Indeed, you have to read through the recipe to find that, after several steps of it  "you should have 2 cups of roasted florets."

Do YOU know how much cauliflower you have to have, to get 2 cups of roasted florets?  Annalena doesn't.  Do YOU know how big a cauliflower you have to start with to get there?  Not she.  So, this is where we get to our first teaching moment.  Here is the cauliflower Annalena bought:
It's a biggun.   It was going to yield way more than 2 cups (By the way, ragazzi, do not fear the brown or black spots on cruciferous vegetables.  Perfectly normal) .  So, you have your cauliflower, and now you prep it, by cutting away the base, and then cutting the florets off.  Make them a nice even size, toward the small:
Toss them with two tablespoons of olive oil, some salt and some pepper, and get them into the oven at 450, for 15-20 minutes.  Stir them half way through.  This is what you get at the end:
While this is roasting, you can get a leg up on things, by making a quick tomato sauce.  To do this, slice two onions into half moons (again, the recipe was a bit nuts on this, saying "either one large onion or one and a half medium onions."  What do you do with the other half of an onion?), and mincing two cloves of garlic.  You will also need a pinch of ground cinnamon and about a half teaspoon , of ground coriander.   Coriander, ragazzi, works so well with cauliflower it should be required in each and every preparation.  Finally, a large (28 or 32 ounce) can of chopped tomatoes.  Or whole tomatoes that you break up with your fingers.   The original recipe called for - Annalena kids you not - "a 14.8 ounce can of tomatoes."  HUH????   Given the amount of cauliflower we have here, the big can is called for. 

Cook the onions in a tablespoon of olive oil, for just about 5 minutes, at medium low heat.   Then toss in the garlic, the spices, and the tomatoes.  Finally, you need a good hefty handful of fresh herbs:  Annalena used oregano rather than the thyme called for because - and pardon the pun, she was out of thyme.  This all goes into the pan with the onions:
You cook it at medium heat for 15 minutes or so, or until the liquid is just about gone:
At this point, your cauliflower is roasted, and you have your sauce.    You can turn the oven down, to 375, and toss the cauliflower into the sauce, off the heat.
You'll see it's in a ceramic baking dish, which Annalena has greased.    Finally, you do something that reminded Annalena of her days of making moussaka.  The original recipe called for 2 large eggs, and 3 ounces of soft goat cheese.  Annalena turned that to three eggs, and 6 ounces.    Beat the eggs, and add about 5 ounces or so of the cheese to it, until the egg/cheese mixture is smooth. Then, pour ALL of that over the cauliflower, and spread it out as best as you can.  Take the remaining bit of cheese, and dot the surface:
And get that into the oven, for 20 minutes.  Your cheese will begin to brown,  and:
Ragazzi, Annalena hopes you realize that you can do all of this ahead of time, and that you don't have to do everything at once.  If you do things in sequence, and not at the same time, Annalena recommends doing the cauliflower last.  You can store the sauce in your fridge, and mixing the eggs and cheese should take you all of about 90 seconds.  

For those of getting ready for the big holiday meals,  think about this.  Or just make it now, and enjoy a seasonal meal or side dish.  They're good for you, carini.  Use the crucifers, and make them tasty.  

Monday, October 19, 2015

Revisiting souffles, but as PUDDING souffles: Leek pudding souffle


Annalena has written before, of how she feels people are too fearful of making souffles.  Alas,  it does seem , ragazzi, that souffle making is like the Marines:  only the few.  Well, she has a new approach that she thinks MAY get some of you to change your mind.  Do understand, that while any kind of souffle making is very easy, there are  many steps, and your commitment is necessary.  Are you ready?  Ok, let's  begin.  This is based on a recipe Annalena saw in the New York Times, and felt was way too pretentious.  So, she is going to try to at least eliminate the pretentiousness.

For people who fear souffles, it seems there are two issues:  one, it's too unstable and it will fall.  Two:  you have to make it NOW:  if you wait, it falls.  Well, pudding souffles avoid that, because of a very simple fact:  their scaffolding is stronger.

Most souffles are essentially not held together by anything, but air.  You are relying on the air you beat into the thing to keep it up and steady.  And that's all fine, but once you break into that souffle, the air releases, and, well...  And breaks are easy.  Oh, are they easy.  It doesn't mean your dish will not be tasty, but the sense of failure when they collapse... Annalena knows.

Pudding souffles are based on a stronger structure:  essentially, a very thick, vegetable bechamel.  The recipe Annalena read allowed you to use vegetables other than leeks; however, in Annalena's mind, leeks are the Cinderella of the vegetable world.  We see them, we wonder about them, and then we move on.  Show of hands:  how many of you have used leeks in ANY way?  Hmmm.  Ok.  Now, how many of you have used them in a way other than vicchyssoise?  Hmmm, lost most of you.  And now, of those of you left, how many have used them for something other than poached leeks?

Well, now you'll have an excuse for a new way to cook them!  Here we go.  We start with our leeks:
 Annalena prepped these before the photo.  You need about 2-2.5 pounds of leeks for this recipe.  Since leeks are usually sold by the bunch,  this can be a bit of a problem, but your shopkeeper should be willing to weigh them for you.  2-2.5 pounds of uncleaned leeks will give you about a pound and a half of what you need, which is the white and light green part, just like the above.    

Next, you get a sharp knife and cut those leeks into thin circles:
 You'll get about 9-10 cups of them, so you'll need a big pan.  While you're cutting them, put a stick of unsalted butter in the pan, and heat it gently.  Don't let it burn.  Annalena actually heats her pan, turns it off, and then puts the butter in, which melts it nicely.  Add the leeks and a pinch of salt, and cook them at medium heat.  You'll see the leeks begin to sweat, and water will come off.  After about 8-10 minutes, you get:
 While these are cooking, you're going to make a small amount of bechamel.  Take a small pot, with a heavy bottom, and put two tablespoons more of unsalted butter, and two tablespoons of flour together.  Melt the butter and whisk the two together.  You'll first get thick clumps, and then it will even out.  Then, add a cup of whole milk, little by little, whisking as you go.   What you want to do is incorporate things, so that there's no solid flour left in the mixture:


You then drop the heat to very low, and let this cook, for about 2-3 minutes,  at a bare bubble.  You'll get a thick white "substance" that is the bane of many people's existence, as it is used incorrectly in  many ways:

Can you see how it thickened, and coats the whisk?  Ok, now mix this stuff with the leeks, and put it all in a blender.  Puree it, and you get a lovely thick "pudding," the color of a luna moth:

You can do this ahead of time, so if you think you want to make a souffle during the week, but you're concerned about time issues, fatigue, etc, do this on the weekend .  That is in fact what Annalena did.   And then when you're ready to make your souffle, really, the hard stuff is behind  you. 

When you're ready to make your souffle, grate half a cup of parmesan cheese, and separate six eggs.   Mix the cheese, and the egg yolks into this custard.    You get:

Before we address the egg WHITES, let's get our oven ready .  You preheat to low: 325, and then gather your pans.  You are going to need something that will hold 1.5-2 quarts worth of liquid: that's where the souffle is going, and you need something big enough for the souffle pan to fit in comfortably.  We're going to use  the "bain maire" or "water bath" (Here, Annalena likes the sound of the pretentious word, so she uses it).  

Now, PLEASE do the next steps in the order Annalena instructs.  It's very easy to slip in what is a very easy maneuver, and burn yourself, and so easy to avoid it.  Put the bigger pan or pot in the oven, and then heat water in a tea kettle, or a pot.   When it comes to a boil, bring the kettle to the oven, and pour the water into the pan. Ragazzi, Annalena cannot tell you how many stories she knows of people who thought "Oh, I can handle this, " and then tried to move a pan of boiling water into the oven, and realized the oven door is closed, tried to maneuver it... and you know what happened.    So do it the way  Annalena instructs.   She really doesn't care if you do other things her way (well, she does), but she worries about safety. 

Next, remember that custard/pudding we made?  It's sitting in a bowl, right?  Now, we're going to beat the six egg whites until they are stiff.  People are afraid of this, but you can do it.  Use a clean whisk, or use your food processor.  Almost none of us have cream of tartar around, which helps, but so does a quarter teaspoon of white vinegar (red will too, but then you color the egg whites an ugly brown shade. So don't do that).  

Just about every souffle recipe makes a distinction between folding and GENTLY folding the egg whites into the custard.  Annalena has never seen the difference.  Work gently,  and quickly, just until the white color disapears from the meringue.  Now pour this into your baking dish, put THAT into the water bath, close the oven door, and go away for an  hour and a half. 

Yup, an hour and a half.  Trust Annalena on this one.  It's worth the wait.    See?
If you are at all like Annalena, you want to eat this.. NOW.  Don't.  It's too hot, and you won't get the flavor of the leeks , which is very subtle.  Leave it in your oven, turned off, and then, when you're ready to eat, warm it up a bit more if it needs it, but it may not.

This is rich.  You need a salad, or some marinated tomatoes, or something like that to go with this.  But try it.  It may seem difficult.  Really, it's not.  Marshall your time, and do it, carini.  And let Annalena know how it all worked out.

Thursday, October 15, 2015

What she learned in Sicily. Home made. No, REALLY - home made, like from scratch, cavatelli


Ragazzi, one of the mountains that many a cook looks at and says "I'm not ready for that," is making her own pasta.    Indeed, Annalena will confess to more than one flirtation with a pasta making machine, which then sat in the kitchen and rusted, before she did use it.  Or, if she DID use it,  she produced mountainous globs of dough that the Guyman and she dutifully ate, thinking quietly  "next time, use a box."  And so it stood.  Until this wonderful trip to Sicily, where Annalena met the incredible Annaliese, who taught her how to make homemade cavetelli.

Cavatelli, or as we called it growing up, gavadeel,  is one of of those wonders of the pasta world.  You've had them:  look at the picture above. Sometimes, they're called "flour dumplings," which Annalena guesses is correct.  , but oh, so misleading, the same way calling spaetzle flour dumplings is.  Taking instruction from Annaliese was so illuminating, so helpful.  Indeed, having spoken to all of the Sicilian cooks she did, Annalena is now ready to try other things. Panelle may be up next.  But she writes about these here, because you should make these. She's serious.  When you see the list of ingredients, and follow Annalena's filter, you will want to make them.  NOW.

There are many, MANY recipes on the internet for making cavatelli, and they are WAY.  TOO.  COMPLEX.  This is what you need:  flour, water.  That is all.  Just make sure you use the right flour.  In Sicily, they use "semolina" flour, which you can get here, but is too coarse.  Use durum flour.  This is the  yellow wheat of Sicily, and it makes a lovely, chewy pasta. You can get it in Italian grocery stores, or from King Arthur.  It's available. Get it.

Proportions with pasta making are "iffy," but you can handle it.  Today was a cool, dry day, so the ratios that Annalena used, were two cups of  flour, and less than 3/4 cups of water.
Can you see a slight yellow color to the flour ? Probably not. But look for the durum flour and you'll see it right away.  

You need to put this flour on a clean surface, and form it into what Annalena has heard called a "vulcano," or fontana:
What you're doing is forming a base for adding the water.  Make sure the walls are high, and thick, because otherwise, you'll have a mess.  That's 2 cups of flour there.  6 ounces of tepid water were ready.  Annalena added 1/2 a cup to the well, and began mixing:  
Do you see the motion?  Sometimes, this is called "frottage" in baking.  Yes, it has another meaning having to do with the boudoir, but we won't discuss that here.  You want to really work the dough, as if you were kneading bread, so that you can develop gluten.  Along the way, add more water if things seem dry.  Use your instinct:  this is an art, not a science. After about five minutes of kneading, you will get something like this:  

Now, when you read recipes for making fresh pasta, you will read "let the dough rest for 30 minutes."  As Annalena learned today, this is a good idea.  She did not do so, because she was so excited, but read on. 

You now need to break this ball of dough into small pieces (Annalena arbitrarily used six), and roll it into thin ropes: 
After this, you cut the ropes into VERY small pieces.  Ideally, they should be no bigger than 1/8 of an inch or so long.  Good luck with that.  But do get them small.  At least the first time,  maybe measure the rope and figure what your ideal number of pieces should be. 

You can cut them all at once, or you can cut them, rope by rope. Whichever way you do it, cover the ones you're not cutting with a cloth, to keep them from drying out. 

Now, the fun part.  You're going to make the cavatelli.  It's hard to depict, but look at the next picture: 
The fork is resting against a surface, and the piece of dough is at the top of it.  Press your thumb into it, and don't be gentle, but don't be mean. Roll it down the fork, and:  
See?  These will get easier as the dough rests, as Annalena found out.  The first two ropes were difficult, but once she got into the rhythm and the dough was relaxed, she got: 
Do you see the flour on them?  You do that to keep them from sticking to each other.  If you're making them that day, cover them with a cloth, and don't refrigerate them.  Keep them away from moisture.  Liquid is the mortal enemy of fresh pasta.    Annalena needed 30 minutes, from start to finish, to make these.

If you go back and look at the ingredients in case you forgot them (water, flour), you will notice the absence of salt.  Well, what that means, is add extra salt to your water.  Bring a big pot of water to the boil.  Add the pasta, and when it comes to the surface, in about 3-4 minutes:
Get a slotted spoon, and pull them out, right into a pan of hot sauce. Not too much of it: 
Toss them in the sauce, and then, if you like (and Annaliese does NOT like),  add cheese.  And you get what's above. 

Please, ragazzi, try this.  You will NOT regret it. They were SO tasty, so delicious, so wonderful.  Make them.  Please.